环境:
Vultr日本 2G内存 Centos7 x64 有公网IP
DO 1G内存 Centos7 x64 有公网IP
Linode 1G内存 Centos7 x64 有公网IP
[Vultr日本1 G内存在索引时报错:FATAL: out of memory (unable to allocate 1278738432 bytes)],可能是Vultr的VPS没有swap的原因
经测试,采集到的英文资源居多。
一.确认python版本,获取ssbc源代码,关闭防火墙
1.环境检测(Ssbc当前版本是基于django1.8.1开发,所需python环境为python2.7.5以上。)
[root@localhost ~]# python -V //执行python -V即可获取当前版本
Python 2.7.5
[root@localhost ~]# systemctl stop firewalld.service //关闭firewall防火墙
[root@localhost ~]# systemctl disable firewalld.service //禁止firewall防火墙开机启动
[root@localhost ~]# systemctl stop iptables.service //关闭iptables防火墙
[root@localhost ~]# systemctl disable iptables.service //禁止iptables防火墙开机启动
2.获取ssbc安装包并解压
[root@localhost ~]# wget https://github.com/78/ssbc/archive/master.zip
[root@localhost ~]# yum -y install unzip
[root@localhost ~]# unzip master.zip
解压后你会发现在/root目录下有个文件夹ssbc-master
二.安装MariaDB,创建数据库
1.安装数据库及所需环境
[root@localhost ~]# yum -y install gcc
[root@localhost ~]# yum -y install gcc-c++
[root@localhost ~]# yum -y install python-devel
[root@localhost ~]# yum -y install mariadb
[root@localhost ~]# yum -y install mariadb-devel
[root@localhost ~]# yum -y install mariadb-server
[root@localhost ~]# cd ssbc-master
[root@localhost ssbc-master]# wget https://raw.github.com/pypa/pip/master/contrib/get-pip.py
[root@localhost ssbc-master]# python get-pip.py
[root@localhost ssbc-master]# pip install -r requirements.txt
2.创建ssbc数据库
[root@localhost ssbc-master]# systemctl start mariadb.service //启动数据库
[root@localhost ssbc-master]# mysql -uroot -p
Enter password: (回车即可)
MariaDB [(none)]> create database ssbc default character set utf8;
MariaDB [(none)]> quit; //创建成功后退出
三.Web服务器设置并启动
[root@localhost ssbc-master]# python manage.py makemigrations
[root@localhost ssbc-master]# python manage.py migrate
[root@localhost ssbc-master]# nohup python manage.py runserver 0.0.0.0:80 >/dev/zero & //启动网站并在后台运行
按回车键继续
浏览器输入http://IP,网站能打开
四.安装Sphinx
[root@localhost ssbc-master]# yum -y install unixODBC unixODBC-devel postgresql-libs
[root@localhost ssbc-master]# wget http://sphinxsearch.com/files/sphinx-2.2.9-1.rhel7.x86_64.rpm
[root@localhost ssbc-master]# rpm -ivh sphinx-2.2.9-1.rhel7.x86_64.rpm
五. 建立文件夹
创建以下文件夹并赋予755权限
[root@localhost ssbc-master]#
mkdir -p /data/bt/index/db /data/bt/index/binlog /tem/downloads
[root@localhost ssbc-master]# chmod 755 -R /data
[root@localhost ssbc-master]# chmod 755 -R /tem
六. 生成索引
[root@localhost ssbc-master]# systemctl restart mariadb.service //重新启动Mariadb
[root@localhost ssbc-master]# systemctl enable mariadb.service //设置mariadb开启自启动
[root@localhost ssbc-master]# indexer -c sphinx.conf --all (all 前面是空格减号减号)
[root@localhost ssbc-master]# searchd --config ./sphinx.conf (config前是空格减号减号)
确定没有报错,继续下一步
七. 开启爬虫(workers目录下)
[root@localhost ssbc-master]# cd workers
1.爬虫运行
执行:[root@localhost workers]# python simdht_worker.py 等2分钟出现数据之后CTRL+C停止
执行:[root@localhost workers]# nohup python simdht_worker.py >/dev/zero & 让爬虫在后台运行
按回车键继续
2.入库索引
执行:[root@localhost workers]# python index_worker.py 等待10分钟出现数据后CTRL+C停止
执行:[root@localhost workers]# nohup python index_worker.py >/dev/zero & 让索引在后台运行
按回车键继续
3.增加后台管理员
[root@localhost workers]#cd ..
[root@localhost ssbc-master]# python manage.py createsuperuser
输入管理员用户名
输入管理员邮箱
输入管理员密码
确认密码,完成
管理员登录地址:http://IP/admin
测试效果:
搜索中文英文关键字均正常
1.png (33.89 KB, 下载次数: 1)
附:
去除搜索页 右下角广告
[root@localhost ssbc-master]# cd web/static/js
[root@localhost js]# vi ssbc.js 找到如下3行,在前面添加//进行注释,保存
// document.write('<script src="http://v.6dvip.com/ge/?s=47688">// <![CDATA[
<\/script>');
 //            document.writeln("<script language=\"JavaScript\" type=\"text/javascript\" src=\"http://js.6dad.com/js/xiaoxia.js\">
// ]]></script>");
// document.writeln("<script src="\"http://js.ta80.com/js/12115.js\"" type="\"text/javascript\""></script>");
1.搜索中文报错
'ascii' codec can't encode characters in position 42-43: ordinal not in range(128)
解决办法:
http://blog.sina.com.cn/s/blog_64a3795a01018vyp.html
vi search/timermiddleware.py
在开头加上
import sys
reload(sys)
sys.setdefaultencoding( "utf-8" )
2.爬虫运行时 可能会遇到如下问题:
Python and Django OperationalError (2006, 'MySQL server has gone away')
解决方法:
http://stackoverflow.com/questions/14163429/python-and-django-operationalerror-2006-mysql-server-has-gone-away
3、索引入库可能会出现如下问题
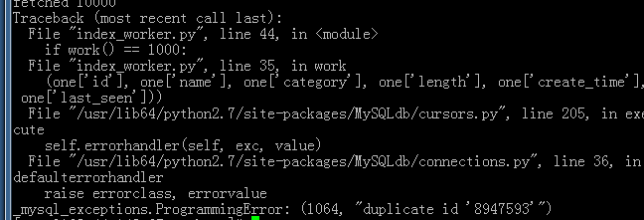
进入mysql,执行一下语句
update search_hash set tagged=True where id=8947593;
这里的id换成你自己的id
常见问题:
1.必须centos7吗?
非常建议使用centos7,centos6可能会有意想不到的错误
2.怎么查看入库的文件?
登录管理员后台,点击 Hashs
3.怎么查看每天入库了多少文件,以便清楚入库效率?
登录管理员后台,点击 Status reports
4.如何确认web服务器、采集、入库正在运行?
ps -ef|grep python
结果里面有
python manage.py runserver 0.0.0.0:80
python simdht_worker.py
python index_worker.py
即表示正在运行。