注意:Alice-LiveMan 使用过程中十分消耗服务器资源,如果只是转播情况相对较好,但是一旦需要使用到内容规制的时候就会对服务器 CPU 有相当的硬性要求。一般超开严重的 VPS 并不适合进行搭建(包括如腾讯、阿里大厂的轻量服务器都带不动)且会对宽带产生较大消耗,如果服务商有宽带限制,请务必不要搭建以免垃圾服务商删机。这里建议使用杜甫搭建,如果没有足够资源支持,建议使用作者现有搭建的站点也便于支持作者,下面是作者的爱发电、 Github 仓库以及站点。感谢作者创造了如此方便的程序!
作者爱发电:https://afdian.net/@aliceliveman
作者站点:https://alice.myloli.me/
Github
前端:https://github.com/nekoteaparty/Alice-Website
后端:https://github.com/nekoteaparty/Alice-LiveMan
准备工作
获取仓库并打包后端程序
这里的使用的系统为 CentOS7 具体操作请根据自己的系统进行变换
使用如下指令获取仓库,如果没有 Git 请自行安装(yum install git or apt-get install git 当然,你也可以 wget curl 什么的)
git clone https://github.com/nekoteaparty/Alice-Website.git
git clone https://github.com/nekoteaparty/Alice-LiveMan.git
这里使用 maven 进行打包,因此需要使用 yum install maven 安装,如果是 Ubuntu 请使用 apt-get install maven 然后将 jar 移动至一个合适目录,如 /home/alicelive/(个人习惯)
cd Alice-LiveMan/
mvn clean package
mkdir /home/alicelive
mv target/liveman-0.0.1-SNAPSHOT.jar /home/alicelive/ #注意,执行的时候你应该在 Alice-LiveMan 目录中
准备前端项目
这里为了方便,也将会移动前端项目到特定文件夹,这里使用的是 lnmp 环境因此习惯性的移动到了 /home/wwwroot/aliceweb
cd ~
mv Alice-Website /home/wwwroot/aliceweb
yum install nodejs npm -y
wget https://dl.yarnpkg.com/rpm/yarn.repo -O /etc/yum.repos.d/yarn.repo
yum install yarn -y
cd /home/wwwroot/aliceweb/
yarn && npm run build #注意,执行的时候你应该在你指定的前端项目目录中
这样,前端也准备好了,接下来直接 run 就行了!(bushi
搭建前端站点 LNMP
如果你还没有自己的域名,你可以在 freenom.com 获取一个免费域名(不建议,如果需要长期运行,建议购置一个域名,但是不要使用 .cn 因为无隐私保护且需要实名,相当于全网公开你的个人信息),或者临时使用服务器 IP 进行接下来的操作,若如此请修改 Nginx 的默认目录
首先解析域名到你的服务器 IP 这里就不过多赘述,如果你不会域名解析,请尝试百度解决问题
lnmp vhost add

Please enter domain(example: www.lnmp.org): youdomain.com
 Your domain: youdomain.com
Enter more domain name(example: lnmp.org *.lnmp.org): Enter
Please enter the directory for the domain: youdomain.com
Default directory: /home/wwwroot/youdomain.com:
Virtual Host Directory: /home/wwwroot/youdomain.com/dist
Allow Rewrite rule? (y/n) n
You choose rewrite: none
Enable PHP Pathinfo? (y/n) n
Disable pathinfo.
Allow access log? (y/n) n
Add SSL Certificate (y/n) y
1: Use your own SSL Certificate and Key
2: Use Let's Encrypt to create SSL Certificate and Key
Enter 1 or 2: 2
注意:上述 youdomain.com 皆表示你要使用的域名,不要傻fufu的直接写 youdomain.com 当然如果你持有 youdomain.com 这个域名那就当没说吧......
接下来修改配置文件
cd /usr/local/nginx/conf/vhost/
vim youdomain.com.conf
#注意,这里你可以使用 vi vim nano 等任意编辑器,如果你使用 vim 不熟练,建议 scp 到本地操作或者使用 nano
这里附带一下 Nginx 配置文件
server
    {
        listen 80;
        #listen [::]:80;
        server_name youdomain.com ;
        index index.html index.htm index.php default.html default.htm default.php;
        root  /home/wwwroot/aliceweb/dist;

        location /api {
            proxy_pass    http://127.0.0.1:8080;
        }

        include enable-php.conf;

        location ~ .*\.(gif|jpg|jpeg|png|bmp|swf)$
        {
            expires      30d;
        }

        location ~ .*\.(js|css)?$
        {
            expires      12h;
        }

        location ~ /.well-known {
            allow all;
        }

        location ~ /\.
        {
            deny all;
        }

        access_log  /home/wwwlogs/youdomain.com.log;
    }

server
    {
        listen 443 ssl http2;
        #listen [::]:443 ssl http2;
        server_name youdomain.com ;
        index index.html index.htm index.php default.html default.htm default.php;
        root  /home/wwwroot/aliceweb/dist;

        ssl_certificate /usr/local/nginx/conf/ssl/youdomain.com/fullchain.cer;
        ssl_certificate_key /usr/local/nginx/conf/ssl/youdomain.com/youdomain.com.key;
        ssl_session_timeout 5m;
        ssl_protocols TLSv1.2 TLSv1.3;
        ssl_prefer_server_ciphers on;
        ssl_ciphers "TLS13-AES-256-GCM-SHA384:TLS13-CHACHA20-POLY1305-SHA256:TLS13-AES-128-GCM-SHA256:TLS13-AES-128-CCM-8-SHA256:TLS13-AES-128-CCM-SHA256:EECDH+CHACHA20:EECDH+CHACHA20-draft:EECDH+AES128:RSA+AES128:EECDH+AES256:RSA+AES256:EECDH+3DES:RSA+3DES:!MD5";
        ssl_session_cache builtin:1000 shared:SSL:10m;
        ssl_dhparam /usr/local/nginx/conf/ssl/dhparam.pem;

        try_files $uri $uri/ /index.html;
        location /api {
            proxy_pass    http://127.0.0.1:8080;
        }

        include enable-php.conf;

        location ~ .*\.(gif|jpg|jpeg|png|bmp|swf)$
        {
            expires      30d;
        }

        location ~ .*\.(js|css)?$
        {
            expires      12h;
        }

        location ~ /.well-known {
            allow all;
        }

        location ~ /\.
        {
            deny all;
        }

        access_log  /home/wwwlogs/youdomain.com.log;
    }
注意,这里的 127.0.0.1 为本地地址,如果你的前端后端不在同设备,请修改为你的后端地址,且注意防火墙端口开放
location /api {
    proxy_pass    http://127.0.0.1:8080;
}
这时,访问 youdomain.com 就可以看到前端页面了
安装 FFmpeg 并且启动后端程序
下载 FFmpeg
cd ~
wget https://johnvansickle.com/ffmpeg/builds/ffmpeg-git-amd64-static.tar.xz
tar -xf ffmpeg-git-amd64-static.tar.xz
cd ffmpeg*/
cp ffmpeg /usr/local/bin/
chmod 755 /usr/local/bin/ffmpeg
这时输入 ffmpeg 看到如下输出,则 FFmpeg 准备完毕
ffmpeg version N-56320-ge937457b7b-static https://johnvansickle.com/ffmpeg/  Copyright (c) 2000-2021 the FFmpeg developers
  built with gcc 8 (Debian 8.3.0-6)
  configuration: --enable-gpl --enable-version3 --enable-static --disable-debug --disable-ffplay --disable-indev=sndio --disable-outdev=sndio --cc=gcc --enable-fontconfig --enable-frei0r --enable-gnutls --enable-gmp --enable-libgme --enable-gray --enable-libaom --enable-libfribidi --enable-libass --enable-libvmaf --enable-libfreetype --enable-libmp3lame --enable-libopencore-amrnb --enable-libopencore-amrwb --enable-libopenjpeg --enable-librubberband --enable-libsoxr --enable-libspeex --enable-libsrt --enable-libvorbis --enable-libopus --enable-libtheora --enable-libvidstab --enable-libvo-amrwbenc --enable-libvpx --enable-libwebp --enable-libx264 --enable-libx265 --enable-libxml2 --enable-libdav1d --enable-libxvid --enable-libzvbi --enable-libzimg
  libavutil      56. 66.100 / 56. 66.100
  libavcodec     58.125.101 / 58.125.101
  libavformat    58. 68.100 / 58. 68.100
  libavdevice    58. 12.100 / 58. 12.100
  libavfilter     7.107.100 /  7.107.100
  libswscale      5.  8.100 /  5.  8.100
  libswresample   3.  8.100 /  3.  8.100
  libpostproc    55.  8.100 / 55.  8.100
Hyper fast Audio and Video encoder
usage: ffmpeg [options] [[infile options] -i infile]... {[outfile options] outfile}...

Use -h to get full help or, even better, run 'man ffmpeg'
启动 Alice-LiveMan
cd /home/alicelive/
java -Dadmin.room.id=187210 -jar liveman-0.0.1-SNAPSHOT.jar
#注意,187210 修改为你的直播间号,而这里的直播间号归属的账号则是 Alice 的 Admin 账号
运行第一次后,目录内结构应如下
alicelive
   ├─keys
   │  └─.key
   ├─logs
   ├─capture.js
   ├─liveman-0.0.1-SNAPSHOT.jar
   ├─phantomjs
   └─setting.bin
如果运行报错,请查看 logs 内的日志文件
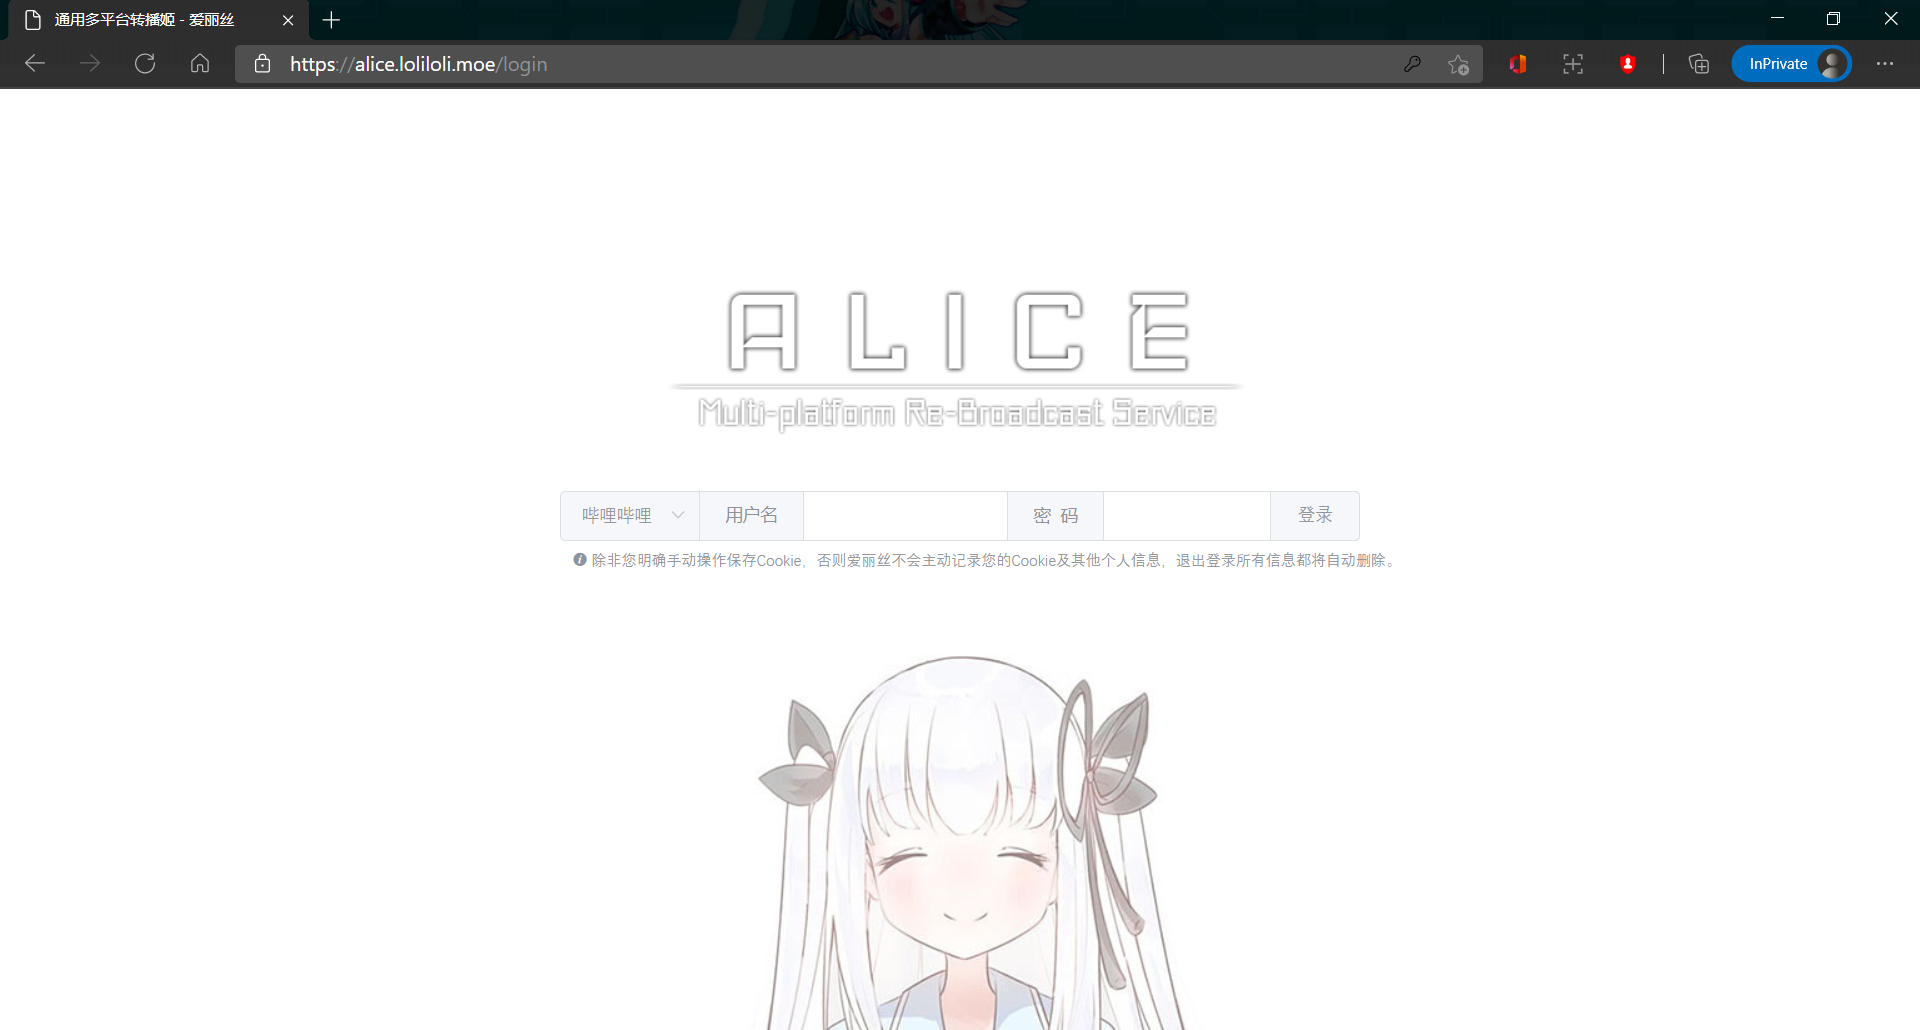
登录 Alice-LiveMan 前端网页面板进行配置
如果上述工作皆正常无误的完成,那么现在你通过 https://youdomain.com 将会看到如下界面
进入面板后选择“系统设置”可以看到如下选项
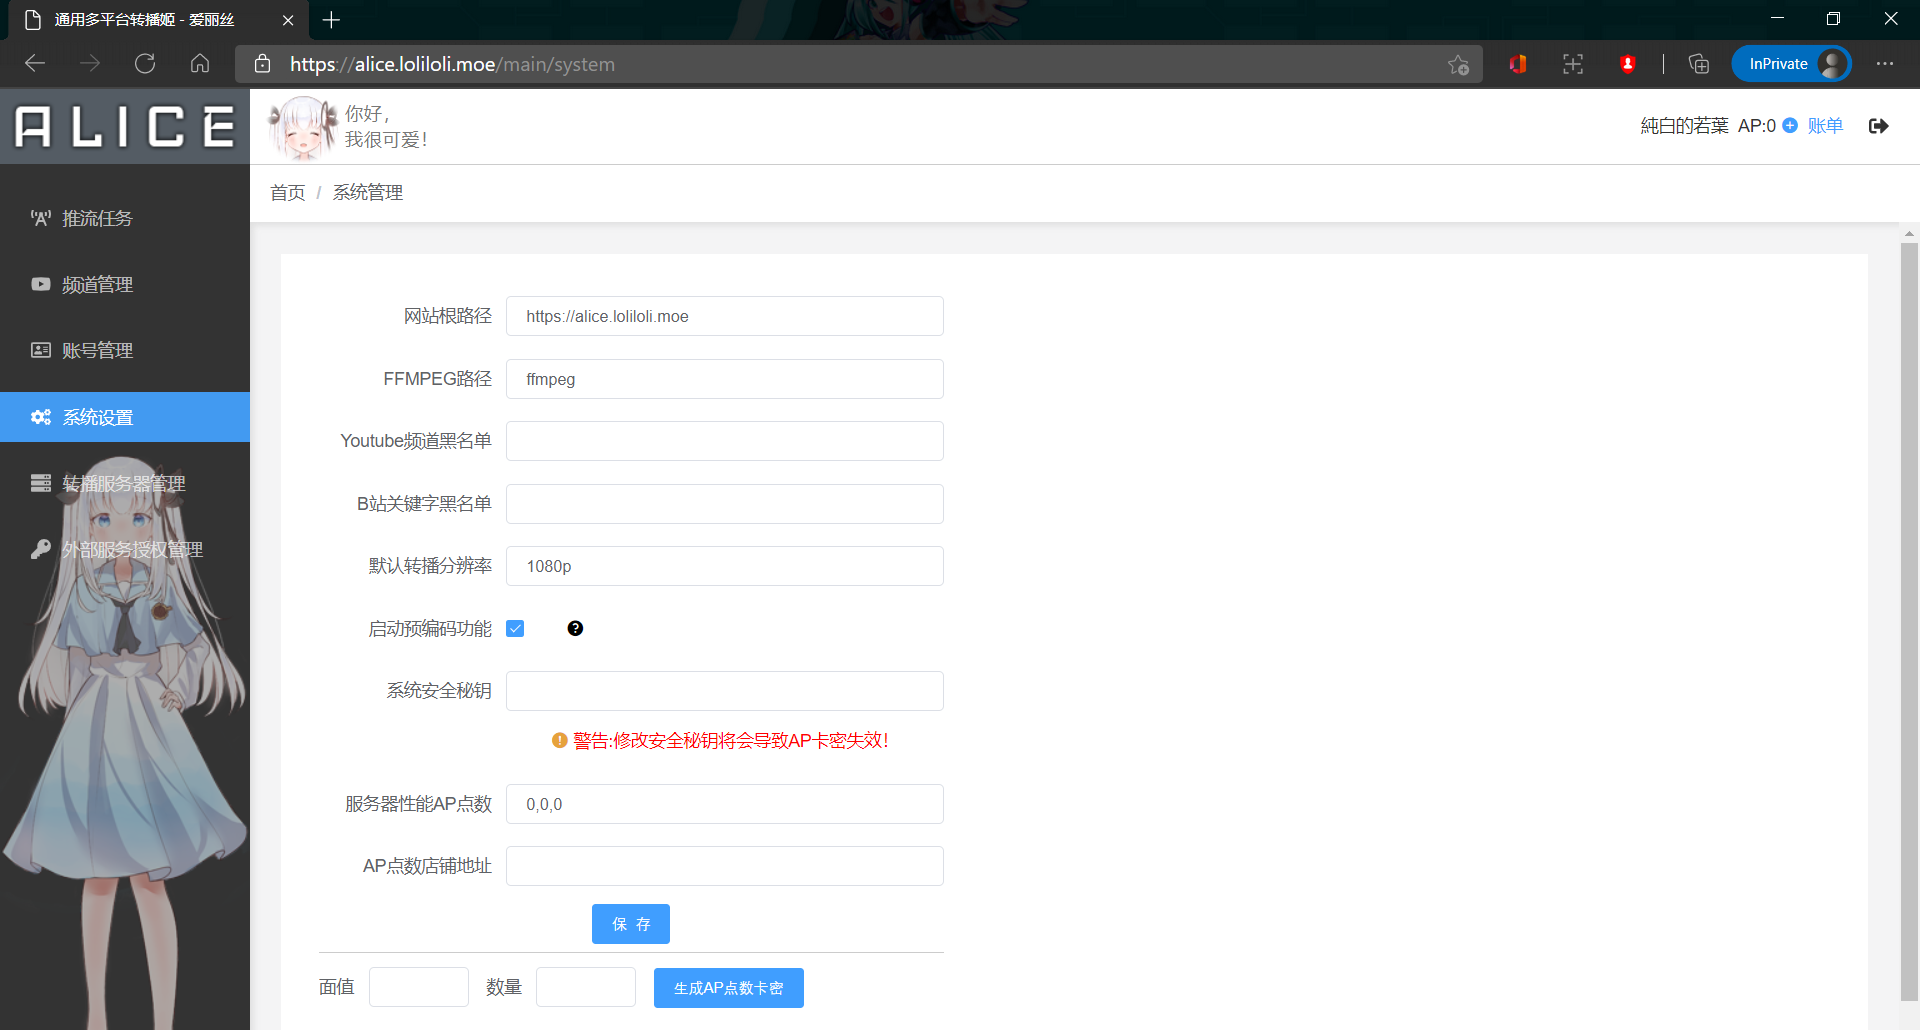
网页路径:youdomain.com
FFmpeg 路径:ffmpeg(前面你已经将 ffmpeg 移动至 /usr/local/bin/ 故只填写 ffmpeg 即可)
其他配置按照需求填写
接下来,选择“转播服务器管理”,并且点击”添加转播服务器“,如下图
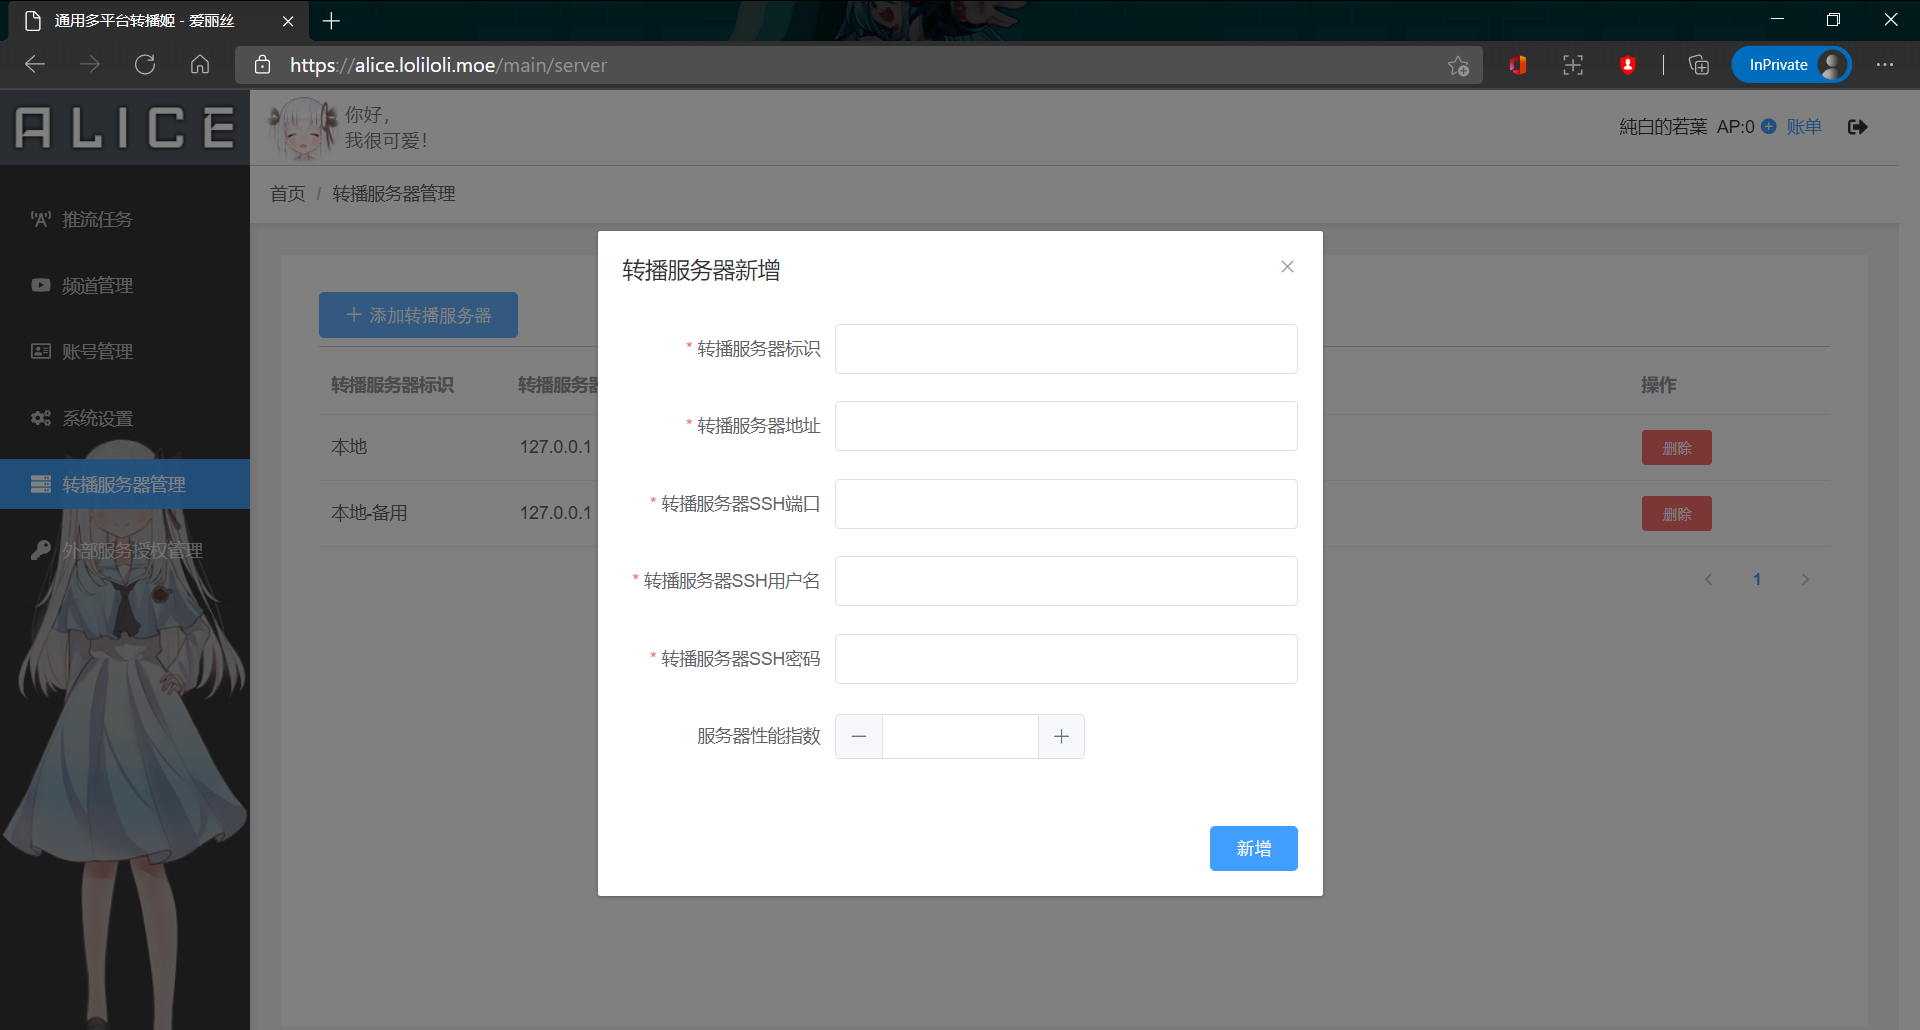
转播服务器标识:标签(如果你的转播服务器比较多,那么建议认真写一下标签)
转播服务器地址:你的转播服务器地址(例如 127.0.0.1 本地)
转播服务器 SSH 端口:你的 SSH 端口(默认 22 如果你有在 /etc/ssh/sshd_config 进行修改,请按照你的实际端口填写)
转播服务器 SSH 用户名:写 root 没问题(如果你有单独建立用户,也可以填写)
转播服务器 SSH 密码:你的 SSH 密码(同上)
服务器性能指数:2(不知道为什么,反正其他的不行直接报错,Debug 发现要求是2,如果有大佬知道为什么还望解答一下QAQ)
注意,如果这里出现报错,那么可能是你没有安装 sshpass 此时你应该 yum install sshpass -y
如此,点击新增即可。
这样,转播姬搭建就基本上完成了,至于其他的使用方法什么的,之后可能会另开一篇简单说明。
使用方法
待更新......(咕!咕!!)